Tiger’s Nest Monastery Hike: Difficulty, Timing, and Tips

The Tiger’s Nest Monastery in Bhutan sits on a cliff at 3,120 meters, about 900 meters above the Paro valley. The hike is moderate. Most people need 5 to 6 hours for the whole trip, including the climb, the temple visit, and the walk back down. You don’t need any climbing experience, just steady legs and a slow, comfortable pace. Go in spring or autumn, start by about 8 am, wear proper shoes, and give yourself a few days in Bhutan before you try it. Horses can carry you halfway to the cafeteria, but the last part is on foot.

If you’re planning a Bhutan tour, the Tiger’s Nest hike is almost certainly on your list. It’s the picture on every postcard, and it’s the one thing most visitors say they’d do again. Here is what the hike is really like, so you can decide how to fit it into your trip.

What Is the Tiger’s Nest Monastery?

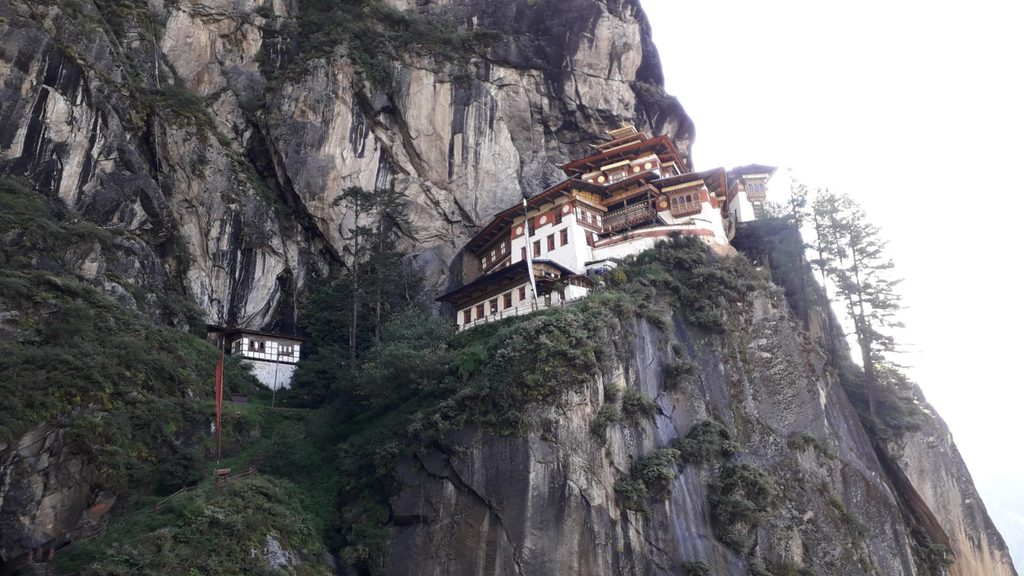
Tiger’s Nest is the English name for Paro Taktsang, a group of temples built into a sheer rock face above the Paro valley. In Bhutanese tradition, the saint Guru Rinpoche flew here on the back of a tigress and meditated in a cave, which is how the place got its name. It became one of the most sacred sites in the Himalayan Buddhist world.

A fire damaged the main buildings in 1998, and they were carefully rebuilt afterwards. Today it’s a working religious site, not a museum. That matters, because it shapes the rules you’ll follow when you visit (more on those below).

Tiger’s Nest Hike at a Glance

Trailhead heightAround 2,600 m
Monastery height3,120 m, about 900 m above the Paro valley floor
DistanceRoughly 8 km round trip (sources vary between 6 and 9 km)
Time5 to 6 hours for most people, including the visit
DifficultyModerate
Halfway stopTaktsang Cafeteria, around 2,950 m
HorsesAvailable to the cafeteria only

How Hard Is the Tiger’s Nest Hike?

It’s moderate. The path is a wide dirt trail with some stone steps, nothing technical, and you won’t need ropes or special gear. What makes it tiring is the steady uphill and the altitude, not the terrain.

If you walk or hike regularly, you’ll be fine. If you mostly sit all day, you can still do it, just slowly. Plenty of first-time hikers, older travelers, and families do this walk. Your guide sets a gentle pace and stops whenever you need a break.

The part people find hardest is usually the final stretch. After the cafeteria the path goes down a long set of stone steps into the gorge, passes a waterfall, and then climbs back up another flight of steps to the monastery entrance. Your legs will notice it, especially on the way back.

How Long Does the Tiger’s Nest Hike Take?

Most people reach the cafeteria in 1 to 1.5 hours, and the monastery in about 2 to 3 hours of walking in total. Add time inside the temples, a rest, and the way down, and you’re looking at 5 to 6 hours. Fast, fit hikers can do it faster. Slower walkers, or people who stop for lots of photos, can take 7 hours. That’s fine. Nobody is timing you.

What Does the Trail Look Like?

Part 1: Trailhead to the cafeteria. You start in a pine forest with prayer flags hanging between the trees and a few prayer wheels along the path. This is the steepest and sweatiest part. Take it slowly.

Part 2: Cafeteria to the viewpoint. The Taktsang Cafeteria is a good place for tea and a rest, and the first proper view of the monastery is just beyond it. This section is gentler than the first.

Part 3: The steps to the monastery. Down into the gorge, past the waterfall, and up again to the entrance. Then you go inside with your guide, who explains what you’re looking at.

Can I Ride a Horse to Tiger’s Nest?

Yes, but only to the cafeteria. Horses wait at the trailhead and carry riders to the halfway point. From there you walk the rest. Local people say that if you ride a horse up, you share the merit of the pilgrimage with it, which is a nice thing to know when you’re deciding.

If you plan to ride, tell your guide in advance. The horse fee isn’t included in most tour prices, so you pay for it separately.
Tiger's Nest Monastery Hike

What Is the Best Time of Year to Hike Tiger’s Nest?

Spring (March to May) is lovely. The valley is green, flowers are out, and the Paro Tshechu festival often falls in this season.

Autumn (September to November) gives you the clearest skies and the best mountain views.

Winter (December to February) is cold but usually sunny, and there are fewer people on the trail.

Monsoon (June to August) is the hardest time. The trail can be slippery, and clouds often hide the monastery. It’s still possible, just bring a good rain jacket and shoes with grip.

What Is the Best Time of Day to Start?

Early. Aim to be on the trail by around 8 am. The air is cooler, the trail is quieter, and the views are clearer before clouds roll in. An early start also leaves you time to rest at the cafeteria and visit the temples without rushing. The temples usually close for a lunch break, so your guide will plan around that.

What Should I Wear and Bring?

  • Sturdy walking shoes or light hiking boots with good grip
  • Layers, since it’s cool in the shade and warm in the sun
  • A light rain jacket
  • At least a liter of water and a few snacks
  • Sunscreen, sunglasses, and a hat
  • A little cash for the cafeteria
  • A small daypack (you’ll leave it in a locker before entering the temples)
  • Trekking poles if your knees complain on stairs. You can also rent a walking stick at the base.

For the temples, wear modest clothes that cover your shoulders and knees.

Rules to Know Before You Go

Tiger’s Nest is a sacred place, and a few rules apply:

  • Phones, cameras, and bags are normally not allowed inside the temples. You leave them in lockers at the entrance, so ask your guide how it works that day.
  • Photos are fine along the trail and at the viewpoint, just not inside.
  • Take off your shoes before entering a temple room, and speak quietly.
  • Walk clockwise around shrines and prayer wheels.
  • You travel with a licensed guide in Bhutan, so you won’t be doing this alone. Your guide handles tickets and explains what you see.

Tips From Guides Who Do This Walk Often

  1. Don’t do it on your arrival day. Paro sits at about 2,250 meters. Give yourself a day or two first.
  2. Go slowly. A steady, slow pace uses less energy than speeding up and stopping.
  3. Treat the cafeteria as a checkpoint. If you feel good, carry on. If you’re tired, rest there and decide.
  4. Save energy for the stairs. The last section is where most people feel it.
  5. Drink water, even if it’s cool. Altitude dries you out faster than you notice.
  6. Check with your doctor first if you have heart, lung, or knee problems.

If you’re a woman traveling alone, our guide to solo female travel in Bhutan covers safety, guides, and what to expect. And if one day on the trail isn’t enough, our Bhutan Trekking Guide walks you through the Druk Path, Jomolhari, and Snowman treks.

How Does Tiger’s Nest Fit Into a Bhutan Tour?

On our 4 Nights 5 Days Bhutan Tour, the Tiger’s Nest hike happens on day four in Paro, after you’ve visited Thimphu and Punakha. You also see Kyichu Lhakhang and Rinpung Dzong in Paro that day. The package covers a licensed English-speaking guide, private transport, hotel stays with all meals, entrance fees, and the Sustainable Development Fee. Visa fees, flights, insurance, tips, and horse rides are extra.

Prices for this Bhutan tour package start from USD 1,280 per person for a solo traveler. The per-person price drops to USD 960 for two people, USD 920 for groups of 3 to 8, and USD 880 for groups of 9 to 12. The trip can also be customized.

If you want more days, see our 6 Nights 7 Days Bhutan Tour and Central Bhutan Tour, or browse all of our Bhutan tour packages. Ask us to confirm the Tiger’s Nest hike is on your itinerary when you inquire.

Frequently Asked Questions

Is the Tiger’s Nest hike hard? It’s moderate. The trail is a steady uphill on dirt paths and stone steps with no climbing. Most reasonably active people manage it at an easy pace.

How long does the Tiger’s Nest hike take? Plan on 5 to 6 hours for the full trip, including the climb, the temple visit, and the walk down. Some people finish faster and some take up to 7 hours.

How far is the Tiger’s Nest hike? Roughly 8 km round trip. Different sources give figures between 6 and 9 km, depending on which route and starting point they measure.

How high is Tiger’s Nest Monastery? The monastery is at 3,120 meters, about 900 meters above the Paro valley. The hike starts at roughly 2,600 meters.

Can you ride a horse to Tiger’s Nest? Yes, to the Taktsang Cafeteria at the halfway point. The rest of the way is on foot.

Can you go inside Tiger’s Nest? Yes, with your guide. Phones, cameras, and bags are left in lockers at the entrance, and photos aren’t allowed inside.

Do I need a guide for the Tiger’s Nest hike? Yes. Travelers in Bhutan go with a licensed guide, who handles entry and explains the temples.

Is there an entrance ticket for Tiger’s Nest? If you travel on a package, entrance fees are included in the itinerary. Horse rides are paid separately.

When is the best time to visit Tiger’s Nest Monastery? March to May and September to November are the most popular months. Start by about 8 am for cooler air and clearer views.

Can kids and older travelers do the Tiger’s Nest hike? Many do. Go slowly, use the cafeteria as a rest point, and consider a horse for the first half. Check with a doctor first if there are any health concerns.

Do I need to worry about altitude sickness at Tiger’s Nest? The monastery is at 3,120 meters, so mild altitude effects are possible for some people. Spend a day or two in Bhutan first, drink plenty of water, and go slowly.

How many days do I need in Bhutan to do Tiger’s Nest? You can fit it into a short trip. Our 4 Nights 5 Days Bhutan Tour includes it, though most people enjoy a few extra days to see more of the country.

Planning a Bhutan Tour With Tiger’s Nest?

If you’re deciding how many days you need, which season to pick, or whether the hike suits your family, we can help. Send us an inquiry with your travel dates, group size, and how active you’d like the trip to be, and we’ll put together a Bhutan tour that includes the Tiger’s Nest hike at a pace that works for you.

Bhutan Trekking Guide: Druk Path, Jomolhari, and the Snowman Trek

Bhutan isn’t a country you trek through quickly, and that’s exactly the point. The trails here are quieter than almost anywhere else in the Himalayas, the scenery swings from pine forest to high alpine lakes within a single day’s walk, and the whole trekking system is set up to protect that experience rather than crowd it. If you’re trying to figure out which Bhutan trek actually fits you, this guide walks through the three routes almost everyone asks about: the Druk Path, the Jomolhari Trek, and the legendary Snowman Trek.

Quick Comparison

Druk Path TrekJomolhari TrekSnowman Trek
Duration5 to 6 days7 to 9 days25 to 30 days
DistanceAround 45 to 55 kmAround 80 to 90 kmAround 300 to 350 km
Max altitudeAbout 4,200mAbout 4,900m (Nyile La)Over 5,300m
DifficultyModerate, good for beginnersChallenging to strenuousExtremely difficult
Best forFirst Himalayan trek, time-limited travelersFit trekkers wanting a proper high-altitude experienceExperienced, highly fit trekkers with a month to spare
Best seasonMarch to June, September to NovemberApril to June, September to NovemberSeptember to October

If you’ve only got five or six days and you want a genuine taste of Himalayan trekking without pushing your body to its limit, the Druk Path is probably the trek people mean when they say “Bhutan trekking” for the first time. It runs between Paro and Thimphu, following an old trade route that connected the two valleys long before roads existed.

Druk Path Trek: The Accessible Classic

What makes it special isn’t drama, it’s variety packed into a short window. You walk through blue pine forest, climb past a string of glacial lakes (Jimilang Tsho and Janetsho are the two most photographed), and get your first real taste of thin mountain air without ever going above about 4,200 meters. Most nights are spent camping beside those lakes, which is reason enough on its own to do this trek.

Who it suits: reasonably fit travelers who hike or walk regularly but aren’t necessarily seasoned mountaineers. You don’t need previous high-altitude experience, though a bit of pre-trip cardio training makes the days noticeably more enjoyable.

Jomolhari Trek: Bhutan’s Signature High-Altitude Route

If the Druk Path is the gentle introduction, the Jomolhari Trek is where things start to feel like a real Himalayan expedition. Named after the sacred 7,326m peak it circles beneath, this is widely considered the best all-rounder among Bhutan’s multi-day treks: long enough to feel like a proper journey, hard enough to earn the views, but still realistic for a fit, motivated trekker without technical climbing experience.

The route typically starts near Drugyel Dzong and follows the Paro Chhu river upstream before climbing to Jangothang, a high meadow that sits almost directly beneath Jomolhari’s north face and doubles as a yak herders’ summer camp. From there, the trek crosses two demanding passes, Nyile La and Yeli La, both sitting close to or above 4,900 meters, before descending back toward the valley.

Expect several consecutive days above 4,000 meters, cold nights even in the warmer trekking months, and at least one, ideally two, acclimatization days built into the itinerary. The reward is some of the most dramatic high-mountain scenery in the country, plus a real sense of the semi-nomadic yak-herding life that still continues in these high valleys.

Who it suits: trekkers with decent stamina and, ideally, at least some previous multi-day hiking experience, though fit beginners who train properly beforehand do complete it successfully every season.

And then there’s the Snowman Trek, which isn’t really in the same category as the first two at all. At 25 to 30 days and well over 300 kilometers, crossing eleven passes above 4,500 meters with a high point over 5,300 meters, this is routinely described as one of the toughest trekking routes anywhere in the world. It’s sometimes said, not entirely as a joke, that more people have summited Everest than have finished the Snowman Trek.

The Snowman Trek: One of the Hardest Treks on Earth

The route essentially continues where the Jomolhari trek leaves off, pushing further north and east through Lunana, one of the most remote inhabited regions on the planet, before eventually descending toward Bumthang. You’ll pass beneath some of Bhutan’s highest and most sacred peaks, including views toward Gangkhar Puensum, generally regarded as the tallest unclimbed mountain in the world.

This isn’t a trek to take on as a personal challenge if you’re newer to high-altitude trekking. The combination of sustained altitude, unpredictable weather, long isolated stretches with no way to exit the route quickly, and sheer duration means it’s genuinely only suitable for experienced, very fit trekkers who’ve done serious multi-day treks before, ideally at altitude.

Who it suits: experienced high-altitude trekkers with a month of availability, strong fitness, and realistic expectations. Weather-related cancellations and route adjustments aren’t rare, so flexibility matters as much as fitness.

Permits, Guides, and How Bhutan Trekking Actually Works

Every trek in Bhutan, regardless of length or difficulty, runs through the same basic structure. You can’t simply show up and hike independently. All foreign trekkers (apart from Indian, Bangladeshi, and Maldivian nationals, who have a somewhat different process) book through a licensed Bhutanese tour operator, who arranges your trekking permit, your guide, your camping crew, and the required Sustainable Development Fee.

This isn’t a bureaucratic hurdle so much as how Bhutan has chosen to manage tourism on these trails, keeping them uncrowded and reducing environmental impact. In practice, it means your trek comes with a full support team: a guide, often a cook, and pack animals (horses or yaks depending on the route) to carry tents, food, and gear, so you’re generally hiking with a daypack rather than full expedition weight.

Best Time to Trek in Bhutan

For the Druk Path and Jomolhari, the two main windows are spring (roughly March through June) and autumn (September through November). Spring brings rhododendron blooms at lower elevations, while autumn generally offers the clearest mountain views and most stable weather.

The Snowman Trek is more weather-sensitive given its extreme length and altitude, and is typically only attempted in a narrower window, usually September into October, when the monsoon has cleared but winter snow hasn’t yet closed the high passes.

What to Pack for Bhutan Trekking

  • Layered clothing, since temperatures swing dramatically between daytime sun and night-time cold at altitude
  • A good four-season sleeping bag, particularly for Jomolhari and the Snowman Trek
  • Broken-in, sturdy trekking boots, not new ones
  • Trekking poles, genuinely useful on the steep descents from high passes
  • A warm hat, gloves, and sun protection, since UV exposure at altitude is intense even in cold weather
  • A personal first-aid kit and any regular medication, discussed with your doctor beforehand

How to Choose the Right Trek for You

If you’ve got less than a week and want a real Himalayan trekking experience without major altitude risk, the Druk Path is the obvious starting point. If you’ve got a bit more time, solid fitness, and want the kind of high-mountain scenery and immersive experience that makes people fall in love with trekking in the first place, Jomolhari is very hard to beat. And if you’re an experienced, highly fit trekker chasing one of the genuine bucket-list routes left in the world, with the time and flexibility a trek like this demands, the Snowman Trek is waiting, though it’s worth being honest with yourself about whether this is really your first Bhutan trek or one for further down the road.

Frequently Asked Questions

Which Bhutan trek is best for beginners? The Druk Path. It’s shorter, stays at a lower maximum altitude than the other major routes, and is specifically designed to work well for travelers who are reasonably fit but new to multi-day Himalayan trekking.

How hard is the Jomolhari Trek compared to the Druk Path? Noticeably harder. Jomolhari runs longer, reaches higher passes, and holds you at altitude for more consecutive days, while the Druk Path is shorter and stays a few hundred meters lower throughout.

Is the Snowman Trek really one of the hardest treks in the world? Yes, by most accounts. The combination of duration (25 to 30 days), multiple passes above 4,500 meters, remote terrain with limited exit options, and unpredictable high-altitude weather puts it in a different category from almost any other trek.

Do I need a guide to trek in Bhutan? Yes. All foreign trekkers must book through a licensed Bhutanese operator, who provides a guide and the full support crew required for trekking permits.

What’s the best season to trek in Bhutan? Spring (March to June) and autumn (September to November) for the Druk Path and Jomolhari. The Snowman Trek is generally limited to a narrower autumn window, typically September into October.

Can beginners attempt the Jomolhari Trek? Fit beginners with no major health concerns do complete it, especially with proper pre-trip training and a well-paced itinerary with acclimatization days built in. It’s more demanding than the Druk Path, so it’s worth training seriously beforehand rather than assuming general fitness is enough.

How much does trekking in Bhutan typically cost? Costs vary by trek length and group size, since permits, guide fees, and the nightly Sustainable Development Fee all factor in. Shorter treks like the Druk Path are considerably less expensive than extended routes like Jomolhari, with the Snowman Trek costing the most given its length and logistics.

Can I combine a trek with a cultural tour of Bhutan? Yes, and most itineraries do exactly this, pairing a trek with time in Paro, Thimphu, and Punakha to balance the physical trekking days with Bhutan’s cultural and historic sites.

Planning a Bhutan Trek?

Picking the right trek comes down to your fitness, your timeline, and honestly, what kind of experience you’re after, not just which trail sounds most impressive. Send us an inquiry with your travel dates, trekking experience, and how many days you have, and we’ll help you figure out whether the Druk Path, Jomolhari, the Snowman Trek, or something in between is the right fit for your trip.